
Image Compression: How to Reduce Image Size Without Losing Too Much Quality
A photo can look perfectly normal on your screen and still be much larger than it needs to be.
A phone photo, screenshot, product image, or website graphic can easily be several megabytes. That's not necessarily a problem when you're storing the original on your computer. It becomes a problem when you need to upload that image to a website, send it by email, add it to an online form, or use dozens of images on a web page.
This is where image compression helps.
Image compression reduces the amount of data needed to store an image while trying to keep the result visually close to the original. The amount of space you can save depends on the image itself, its format, and the compression settings you choose.
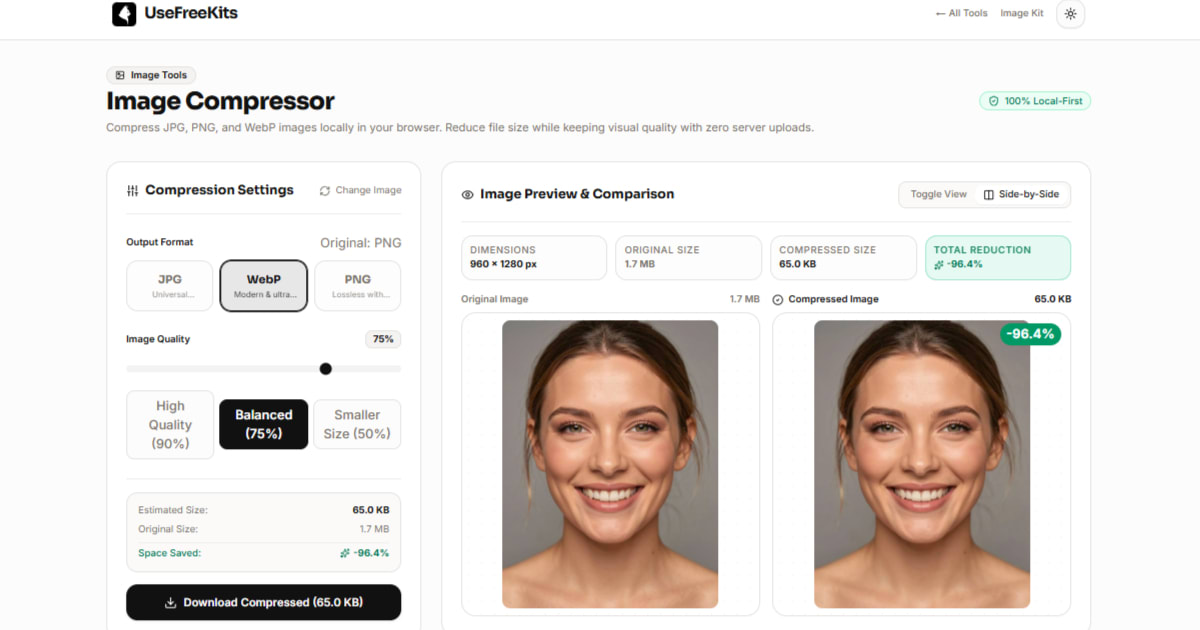
For a quick way to test this yourself, you can use the UseFreeKits Image Compressor. It supports JPG, PNG, and WebP images and processes them directly in your browser without uploading the image to a server.
What is image compression?
Image compression is the process of reducing the file size of an image.
For example, imagine you have a 2 MB photograph that you want to upload to a website. If the compressed version is 500 KB and still looks good at the size where it will actually be displayed, you've reduced the amount of data the website needs to load.
The important part is that smaller does not automatically mean better.
If you compress an image too aggressively, you may start seeing blurry details, blocky areas, color changes, or other visible artifacts.
Good image compression is therefore a balance:
Smaller file size + acceptable visual quality
The right balance depends on what you're doing with the image.
A photograph used as a large website banner may need more quality than a small thumbnail. A product image may need to preserve fine details, while a simple graphic may work better as a PNG or another format.
Why does image file size matter?
Large images can create problems in several everyday situations.
Websites
Images are often some of the largest files downloaded when someone opens a web page. If a page contains many large photographs, visitors may need to download a lot of unnecessary data.
Reducing image sizes can make those downloads smaller.
That doesn't mean compression alone will make every website fast. Hosting, caching, JavaScript, fonts, server response time, image dimensions, and other factors also matter.
But unnecessarily large images are an easy thing to fix.
Upload limits
Some websites restrict the size of files you can upload.
You might have a perfectly suitable image that is simply too large for the upload form.
Compressing the image can bring it below the required limit without requiring you to completely change the image.
Email and messaging
Large attachments can also be inconvenient when sending images.
If the recipient doesn't need the full original file, a smaller copy can often do the job.
Storage
If you keep large copies of images for every version of a project, storage requirements can grow quickly.
Compression can help when you need smaller working copies while keeping the original files separately.
Compression is not the same as resizing
This is one of the most useful distinctions to understand.
Compression changes how efficiently the image data is stored.
Resizing changes the dimensions of the image.
Suppose you have an image that is 4000 × 3000 pixels.
Compressing it may reduce its file size while keeping those dimensions.
Resizing it to 1600 × 1200 pixels actually reduces the number of pixels in the image.
These two techniques can also be used together.
For example, if you're preparing a photograph for a website, the original might be much larger than the dimensions the website actually displays. Resizing it first and then compressing it can produce a significantly smaller file.
Use compression when the dimensions are appropriate but the file is unnecessarily large.
Consider resizing when the image itself is much larger than the space where it will be used.
JPG, PNG, or WebP: Which format should you use?
The image format you choose has a significant effect on file size and quality.
JPG / JPEG
JPG is a common choice for photographs.
It works particularly well for images containing lots of colors and continuous tones, such as:
Photos
Travel pictures
Portraits
Product photographs
Website banners
JPG uses lossy compression, which means some image information can be discarded to reduce the file size.
At reasonable quality settings, the visual difference may be difficult to notice.
One limitation is transparency. JPG doesn't preserve transparent backgrounds.
PNG
PNG is useful when preserving image detail and transparency is important.
It's commonly used for:
Logos
Icons
Screenshots
Graphics
Images with transparent backgrounds
PNG uses lossless compression, so it preserves the image's pixel information rather than intentionally discarding visual detail.
However, a PNG photograph can be considerably larger than a similarly suitable WebP or JPG version.
That's why simply choosing PNG for every image isn't always a good idea.
WebP
WebP is a modern image format designed to provide efficient compression while supporting features such as transparency.
It can be a useful choice for websites where reducing image size matters.
The UseFreeKits Image Compressor allows you to switch between JPG, WebP, and PNG when processing an image. The tool's format guide also notes that WebP can provide smaller files than JPEG at comparable quality, although the actual result depends on the image and settings.
If you're preparing images specifically for a modern website, WebP is often worth testing rather than automatically sticking with JPG or PNG.
Lossy vs. lossless compression
You'll often see these two terms when researching image compression.
Lossy compression
Lossy compression removes some information from the original image to achieve a smaller file size.
JPG is a familiar example.
The advantage is that you can often achieve substantial file-size reductions while keeping the image visually acceptable.
The disadvantage is that excessive compression can become visible.
Lossless compression
Lossless compression reduces file size without discarding the original pixel information.
PNG is commonly associated with this approach.
The advantage is that the image retains its original visual information.
The trade-off is that the resulting file may not be as small as a lossy version.
Neither approach is universally better. The appropriate choice depends on the image and what you're going to do with it.
How much should you compress an image?
There isn't one compression percentage that works for every image.
A photograph with lots of detail may respond differently from a simple graphic.
For example, you might have an image where a moderate quality reduction makes the file dramatically smaller while the difference is difficult to notice.
Another image might show visible degradation much sooner.
That's why comparing the original and compressed versions is more useful than blindly choosing the smallest possible file.
A good workflow is:
Start with a reasonable quality setting.
Compress the image.
Compare it with the original.
Check the new file size.
Look closely at important details.
Increase or decrease the quality if necessary.
The goal isn't to win a competition for the smallest file.
The goal is to find a file that is small enough for the job and still looks good.
How to compress an image with UseFreeKits
The UseFreeKits Image Compressor is designed for this exact workflow.
You don't need to install image-editing software or create an account.
1. Select your image
Open the UseFreeKits Image Compressor and drag an image into the upload area, or select one from your device.
The tool supports JPG, PNG, and WebP files up to 30 MB.
2. Choose the output format
You can select the format you want for the compressed image:
JPG
WebP
PNG
The best choice depends on the type of image and whether you need features such as transparency.
If you're not sure, try WebP for a web image and compare the result with the original.
3. Adjust image quality
The compressor provides a quality slider along with presets.
The available presets include:
High Quality - 90%
Balanced - 75%
Smaller Size - 50%
You can also adjust the quality manually.
Starting with the Balanced setting is a sensible way to test an image without immediately pushing compression too far.
4. Compare the original and compressed image
This is one of the most useful parts of the tool.
Instead of relying only on the percentage shown, you can actually inspect the result.
Use the comparison controls to view the images in Toggle mode or Side-by-Side mode.
The tool also shows information such as:
Original dimensions
Original file size
Compressed file size
Total percentage reduction
That gives you both sides of the decision: how much space you saved and what the image looks like afterward.
5. Download the compressed image
Once you're happy with the result, download the compressed file.
You can then upload it to your website, attach it to a document, send it to someone, or keep it as a smaller copy.
A simple example
Suppose you have a 1.7 MB photograph.
After compression, you might get a file that is significantly smaller while still looking almost identical at the size you actually need.
But the exact result isn't something you should expect to be identical for every image.
A photograph with lots of textures and fine details, a screenshot containing text, and a simple graphic can all behave differently during compression.
That's why the before-and-after comparison is important.
Don't judge compression purely from the percentage saved.
Look at the image.
What happens to image quality?
The answer depends mainly on the format and compression settings.
At moderate settings, you may not notice much difference when viewing the image at its intended size.
At aggressive settings, you may start noticing:
Blurred fine details
Blocky edges
Loss of texture
Color changes
Compression artifacts around text or sharp edges
If you notice these problems, increase the quality setting and compare again.
There is usually no reason to keep an image at an unnecessarily low quality just to save a few additional kilobytes.
What happens when you convert PNG to JPG?
This is something to pay attention to if your image has a transparent background.
PNG supports transparency.
JPG does not.
So if you take a PNG logo with a transparent background and convert it to JPG, the transparent areas cannot remain transparent.
The UseFreeKits compressor therefore provides separate format options rather than treating every format as interchangeable. Its format guide notes that transparent areas are composited onto a solid background when converting to JPEG.
If transparency matters, don't automatically convert the image to JPG just because the resulting file may be smaller.
Why doesn't changing quality always make a PNG much smaller?
This can be confusing if you're new to image compression.
A quality slider is particularly useful for formats where lossy quality compression is being applied.
PNG works differently because it is a lossless format.
So reducing a "quality" value doesn't necessarily produce the same kind of file-size reduction you might see with a JPG.
If your main objective is to significantly reduce the size of a photographic PNG, converting it to an appropriate format such as WebP may produce a more meaningful difference.
However, remember that conversion can change characteristics such as transparency or compatibility, so check the result before replacing the original.
Does the image get uploaded to a server?
This is one of the useful characteristics of the UseFreeKits Image Compressor.
The compression runs locally in your browser using the HTML5 Canvas API. The tool states that the selected image isn't uploaded to a remote server and that processing happens on your device.
That means you can compress an image without first sending the file to an external image-processing service.
This can be particularly useful when you're working with personal photographs, screenshots, design assets, or other images you'd prefer to keep on your own device.
As always, browser-based privacy features don't replace your organization's own data-handling requirements. If you're processing confidential material for work, follow the relevant policies for your organization.
Common image compression mistakes
There are a few easy mistakes to avoid.
Compressing everything to the smallest possible size
A smaller file isn't automatically a better file.
If the image looks noticeably worse, you've probably compressed it too aggressively.
Using PNG for every photograph
PNG is excellent for some types of images, but it isn't automatically the best choice for photographs.
Test JPG or WebP when appropriate.
Converting transparent images without checking them
If the original uses transparency, check the output after converting to JPG.
Keeping huge dimensions
Compression doesn't necessarily solve the problem of an image being much larger than the display area.
If you're uploading a 5000-pixel-wide photograph into a space that displays it at 1000 pixels wide, resizing may also be worth considering.
Repeatedly compressing the same JPG
With lossy formats, repeatedly opening, modifying, and re-saving an image can introduce additional degradation.
Keep your original image and create compressed versions from that original whenever possible.
Keep the original image
One simple habit can save you a lot of frustration:
Don't overwrite your original.
Keep the full-quality original somewhere safe and create compressed copies for specific uses.
For example:
product-photo-original.jpg
product-photo-website.webp
product-photo-email.jpg
This gives you flexibility later.
If you discover that the website version is too compressed, you can create another version from the original instead of trying to recover quality from an already compressed copy.
When should you compress an image?
Image compression is particularly useful before:
Uploading images to a website
Adding photographs to blog posts
Sending large image attachments
Uploading images to forms with file-size limits
Preparing product images
Sharing images where the recipient doesn't need the original
Creating smaller copies for web use
For archival purposes, however, you may want to retain the original high-quality file rather than treating the compressed copy as your only version.
Compress images without installing software
For occasional image compression, you don't necessarily need a desktop image editor.
The UseFreeKits Image Compressor provides the basic controls needed for the job: choose an image, select an output format, adjust quality, compare the result, check the size reduction, and download the compressed file. It works directly in the browser and supports JPG, PNG, and WebP files.
There's also no need to create an account just to perform a simple compression task.
If you're compressing an image for a website, don't just choose the most aggressive setting. Start with a reasonable quality level, compare the result, and use the smallest version that still looks right for its intended purpose.
Compress an image with UseFreeKits →
Frequently Asked Questions
Is image compression the same as resizing?
No. Compression reduces the amount of data used to store an image, while resizing changes its pixel dimensions. You can use both techniques together.
Can I compress JPG images?
Yes. UseFreeKits supports JPG/JPEG images and lets you adjust the compression quality before downloading the result.
Can I compress PNG images?
Yes. PNG is supported. However, PNG uses lossless compression, so changing a quality setting may not produce the same file-size reduction you'd see with JPG.
Can I compress WebP images?
Yes. WebP is supported as both an input and output format.
What is the maximum image size?
The UseFreeKits Image Compressor supports images up to 30 MB.
Does UseFreeKits upload my images?
No. The compressor processes images locally in your browser using HTML5 Canvas rather than uploading them to a remote server.
Will compression always reduce image quality?
Not necessarily in a way that is noticeable to you. The result depends on the image, format, and compression level. More aggressive lossy compression generally increases the chance of visible quality loss.
Is WebP better than JPG?
There isn't a universal answer. WebP can produce smaller files at comparable quality, while JPG remains highly compatible and is a practical choice for many photographs. Test the formats with your particular image and use the version that meets your needs.
Final thoughts
Image compression isn't about making every image as small as possible.
It's about removing unnecessary file size while keeping enough quality for the job.
For a website, that might mean converting a large photograph to WebP and reducing its quality until the visual difference is difficult to notice. For a transparent logo, keeping PNG may make more sense. For an image that's simply much larger than the area where it will be displayed, resizing may be just as important as compression.
The best approach is simple: compress, compare, and choose the smallest version that still looks right.
If you need to compress an image without installing software, you can try the free UseFreeKits Image Compressor. Your image is processed locally in your browser, and you can compare the original and compressed versions before downloading the result.