
Markdown Previewer: How to Write, Preview, and Export Markdown
If you've ever opened a README file on GitHub, written documentation for a software project, or worked with a static website, you've probably come across Markdown.
Markdown looks like ordinary text, but a few simple characters can turn that text into headings, lists, links, quotes, code blocks, and other formatted elements.
For example, this:
# My Project

This is a **simple** project.

- Easy to use
- Free to modify
- Open source
can be rendered as a properly formatted document.
The advantage is that Markdown is relatively easy to write and remains readable even when you're looking at the raw source.
The difficult part is sometimes knowing exactly how that Markdown will look after it has been rendered.
That's where a Markdown previewer comes in.
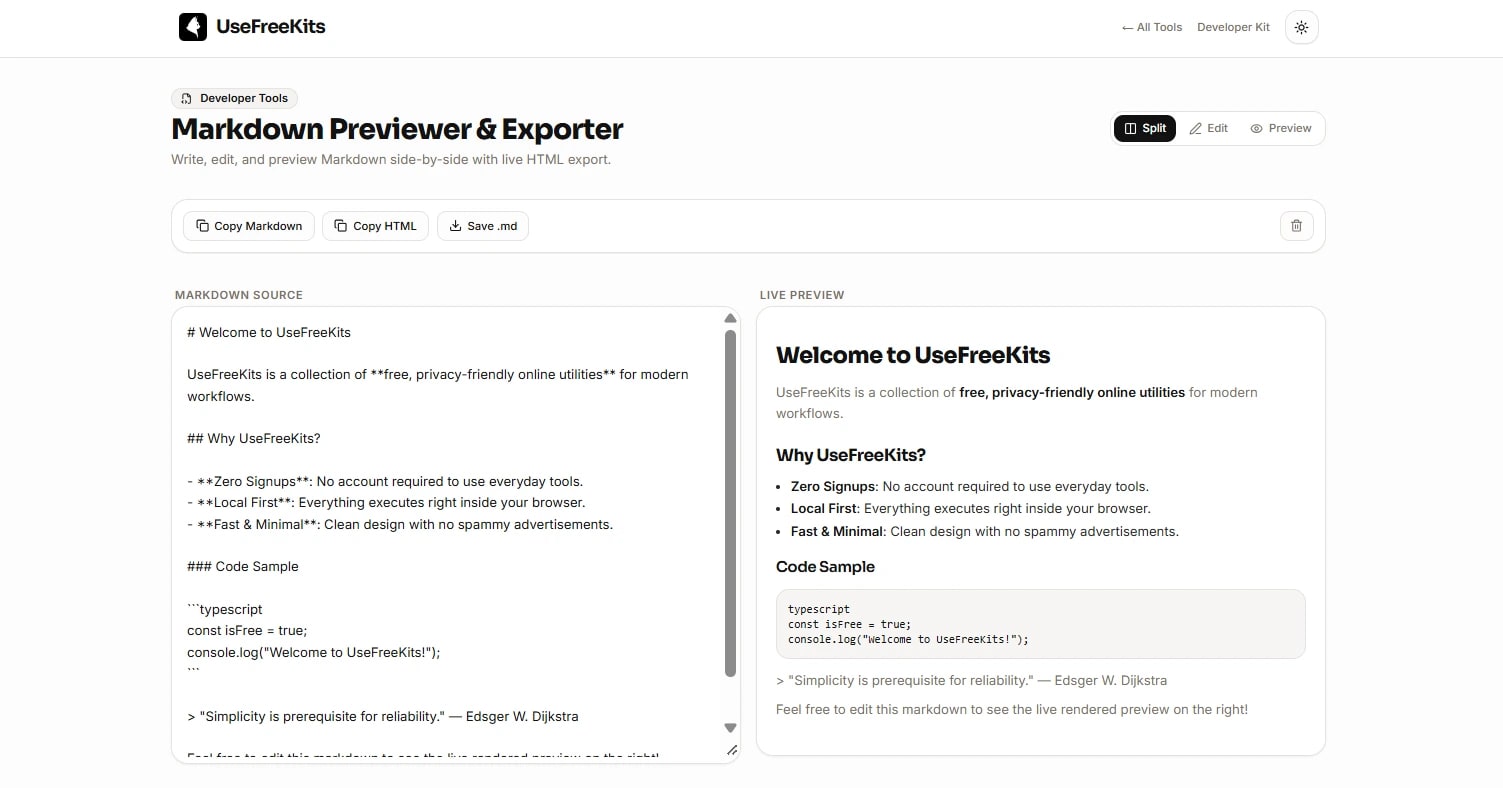
The UseFreeKits Markdown Previewer & Exporter lets you write or paste Markdown on one side and see the rendered result beside it. You can also copy the raw Markdown, copy the generated HTML, or download the document as a .md file.
What is Markdown?
Markdown is a lightweight markup language used to add structure and formatting to plain text.
Instead of clicking buttons for every formatting option, you use simple characters.
For example:
# Main Headingcreates a heading.
And:
**important text**makes the text bold.
A bulleted list can be written as:
- First item
- Second item
- Third item
You don't need a complicated editor to create any of these.
That's one of the reasons Markdown is popular with developers, writers, documentation teams, and people who work with content stored as plain text.
Why do people use Markdown?
Markdown sits somewhere between plain text and fully formatted documents.
A Word document can contain a lot of formatting information that isn't immediately visible when you're working with the text.
Markdown takes a different approach.
The formatting is represented directly in the text.
For example:
## Installation

Run the following command:

`npm install example-package`
Even without rendering it, you can understand what the document is trying to communicate.
This makes Markdown particularly convenient for:
README files
Software documentation
Project notes
Technical articles
Developer documentation
GitHub repositories
Static websites
Knowledge bases
Simple content drafts
What is a Markdown previewer?
A Markdown previewer takes Markdown source and displays the rendered result.
Think of it as a live translation between two views:
Markdown source → rendered document
For example:
## Features

- Fast
- Simple
- Free
The preview shows the result as a heading followed by a bulleted list.
This is useful because Markdown syntax can be easy to mistype.
You might accidentally use the wrong number of # characters, forget a closing backtick, or create a list with inconsistent formatting.
A live preview lets you catch those problems immediately.
Why preview Markdown instead of just writing it?
Markdown is intentionally simple, but that doesn't mean every document will render exactly as you expect.
Consider a heading:
# Project DocumentationThat's easy enough.
But once your document contains several heading levels, links, lists, quotes, inline code, and code blocks, it becomes harder to visualize the final result from the raw Markdown alone.
A preview solves that problem.
You can write on one side and see the result on the other.
This is particularly useful when you're preparing documentation that someone else will eventually read.
Markdown headings
Headings are one of the most common pieces of Markdown syntax.
A level-one heading uses one #:
# Main HeadingA level-two heading uses two:
## SectionAnd a level-three heading uses three:
### SubsectionUse headings to create a clear hierarchy.
For example:
# Product Documentation

## Installation

### Requirements

## Configuration

### Environment Variables

## Troubleshooting
The reader can immediately see how the sections relate to one another.
The UseFreeKits previewer supports H1 through H3 headings and renders them as semantic HTML headings.
Bold and italic text
Markdown makes basic emphasis simple.
For bold text:
**This is bold**For italic text:
*This is italic*You can also combine formatting when needed.
For example:
**This is *important*.**The exact appearance depends on the renderer, but a Markdown previewer gives you a quick way to see the result.
Creating lists in Markdown
Lists are another common use of Markdown.
An unordered list can be written like this:
- Install the application
- Create an account
- Open the settings
- Save your changes
The rendered version becomes a normal bulleted list.
Lists are particularly useful in documentation because they break instructions and information into smaller pieces.
You can use them for:
Requirements
Features
Steps
Options
Notes
Checklists
Blockquotes
Markdown also supports blockquotes.
For example:
> This is an example of a blockquote.The > character tells the Markdown parser that the line should be treated as a quotation or highlighted block of text.
Blockquotes can be useful when documenting an important note, quoting someone, or separating a piece of information from the surrounding text.
Inline code and code blocks
This is one area where Markdown becomes particularly useful for developers.
If you want to display a short piece of code within a sentence, you can use backticks:
Run `npm install` before starting the project.For a larger code example, fenced code blocks are more appropriate:
```javascript
const message = "Hello";
console.log(message);
```
The UseFreeKits previewer supports fenced code blocks and inline code, making it useful for README files and technical documentation where code examples are common.
What is GitHub Flavored Markdown?
You may hear the term GFM, which stands for GitHub Flavored Markdown.
It refers to Markdown conventions and extensions used by GitHub.
GitHub supports Markdown extensively across places such as README files, issues, pull requests, and documentation.
The UseFreeKits Markdown Previewer supports standard CommonMark and GitHub Flavored Markdown features, including headings, bold and italic text, blockquotes, unordered lists, inline code, and fenced code blocks.
This makes the previewer particularly useful when you're preparing content intended for a GitHub repository.
However, Markdown implementations can differ between platforms, so it's still worth checking the final destination if you're relying on platform-specific behavior.
Markdown vs HTML
Markdown and HTML solve related problems in different ways.
HTML uses tags:
<h2>Installation</h2>
<p>Download the package and install it.</p>
Markdown is more compact:
## Installation

Download the package and install it.
HTML provides much more control over the structure and behavior of a web page.
Markdown is easier to write for many common content structures.
That's one reason Markdown is popular for documentation.
You can write relatively simple source and then convert it into HTML when necessary.
Why convert Markdown to HTML?
Suppose you've written an article or documentation page in Markdown.
Eventually, you may need HTML because your content management system or website editor expects HTML.
You could manually rewrite the document using HTML tags, but that becomes tedious as the document gets longer.
A Markdown-to-HTML exporter handles that conversion for you.
The UseFreeKits Markdown Previewer provides a Copy HTML option that lets you copy the rendered HTML and use it elsewhere. The tool describes its output as sanitized, semantic HTML suitable for environments such as WordPress, Webflow, Ghost, and static-site generators.
That creates a useful workflow:
Write Markdown → Preview it → Copy HTML → Paste it into your website
How to use the UseFreeKits Markdown Previewer
The tool is designed around a simple editor-and-preview workflow.
You can open the UseFreeKits Markdown Previewer & Exporter and start writing immediately.
1. Write or paste Markdown
The left side of the editor is where you enter your Markdown source.
You can start from scratch or paste an existing README, documentation draft, or notes.
The tool specifically supports workflows involving README files, documentation drafts, and notes.
2. Watch the live preview
As you change the Markdown, the preview updates on the other side.
This lets you see how headings, lists, code blocks, quotes, and other supported Markdown elements will appear.
You don't need to save the document and open another application just to check the formatting.
3. Choose your view
The tool provides multiple viewing modes.
Split mode keeps the editor and preview visible together.
Edit mode gives you more space for writing.
Preview mode focuses on the rendered document, which can be particularly useful on smaller screens.
4. Copy Markdown or HTML
Once your document is ready, you can copy the raw Markdown or copy the generated HTML.
This is useful when you're moving the content to another application.
5. Download the Markdown file
You can also download the document as a .md file.
That gives you a local copy of your Markdown document instead of leaving it only inside the browser.
A practical README example
Let's say you've created a small software project.
A basic README might look like this:
# My Project

A simple tool for organizing project tasks.

## Installation

Clone the repository:

```bash
git clone https://example.com/my-project.git
Features
Simple interface
Fast setup
Easy configuration
Usage
Run the application and follow the instructions on screen.
Looking at the raw Markdown gives you a good idea of the structure.

But previewing it makes it easier to spot problems with headings, lists, code blocks, or spacing before you publish the README.

That's where a previewer becomes useful.

---

# Previewing code blocks before publishing

Code blocks are particularly easy to get wrong.

For example, you need opening and closing fences:

````markdown
```python
print("Hello")
If one of those fences is missing, the rest of your document may not render the way you expected.

A live preview lets you catch that sort of formatting problem while you're still editing.

For technical documentation, this can save time because you don't have to repeatedly upload the Markdown to another platform just to check whether the formatting works.

---

# Markdown previewing for documentation

Documentation is one of the areas where Markdown shines.

A typical documentation page might contain:

- A title
- An introduction
- Installation instructions
- Configuration information
- Code examples
- Lists
- Notes
- Troubleshooting steps

All of those can be represented relatively cleanly in Markdown.

A previewer gives you a quick visual check before the document is published.

This is especially useful if you're writing documentation that will eventually be converted to HTML.

---

# Markdown previewing for blog content

Markdown isn't limited to developers.

Writers can also use it as a simple way to structure articles.

For example:

```markdown
# How to Organize a Project

## Start With the Goal

Write down what the project needs to accomplish.

## Break It Into Tasks

- Research
- Planning
- Implementation
- Testing
```

The Markdown source remains easy to edit, while the preview provides a more conventional reading view.

If your publishing system accepts HTML, you can then copy the generated HTML instead of rebuilding the formatting manually.

---

# What is semantic HTML?

When Markdown is rendered into HTML, the resulting HTML should ideally describe the meaning and structure of the content rather than just its appearance.

For example, a heading should be represented as a heading element.

A paragraph should be a paragraph.

A list should be a list.

This is part of what is meant by **semantic HTML**.

The UseFreeKits tool describes its HTML export as sanitized and semantic, with output intended for use in places such as WordPress, Webflow, Ghost, and static-site generators. :contentReference[oaicite:11]{index=11}

That can make exported content easier to work with than manually formatting everything from scratch.

---

# Markdown files are useful because they're plain text

One of Markdown's biggest advantages is that the source is just text.

A `.md` file can be opened with many different editors.

You don't need a particular word processor to understand the basic contents.

This also makes Markdown convenient for software projects.

Documentation can live alongside source code in a repository, be tracked through version control, and be edited without relying on a proprietary document format.

For a developer, that simplicity can be more important than having dozens of formatting controls.

---

# Common Markdown mistakes

Markdown is relatively easy to learn, but a few small mistakes come up regularly.

## Forgetting heading spaces

This:

```markdown
#Heading
```

is not the same as:

```markdown
# Heading
```

When you're writing headings, keep the space after the `#` characters.

## Forgetting to close a code block

If you open a fenced code block:

````markdown
```javascript
const value = true;
you need to close it:
```javascript
const value = true;
```
Otherwise, later content may be interpreted as code.
Mixing list styles unnecessarily
Try to keep your list formatting consistent within a section.
For example:
- First item
- Second item
- Third item
is easier to maintain than switching between several list styles without a reason.
Using too many heading levels
Headings should represent the structure of the document.
Don't use ### simply because you want smaller text.
A heading hierarchy is easier to understand when each level has a meaningful relationship to the level above it.
Markdown previewer vs Markdown editor
These terms are sometimes used interchangeably, but they're not exactly the same.
A Markdown editor focuses primarily on writing and editing Markdown.
A Markdown previewer focuses on showing how that Markdown will be rendered.
Some tools combine both.
That's what UseFreeKits does: you can write Markdown, see the live rendered result, switch between editing and preview views, and export the content.
For many everyday Markdown tasks, having both functions in the same place is more convenient than using separate applications.
Does the previewer work offline?
The UseFreeKits tool is designed to run client-side in the browser. Its page describes the workflow as running in the browser and identifies the tool as local-first.
This is useful if you want to work on Markdown without sending the document to a remote processing service.
It can also be convenient when you're working with notes or documentation that you don't want to upload elsewhere.
As with any browser-based tool, however, don't assume that "local" replaces your organization's security requirements for confidential material. Follow whatever rules apply to the information you're handling.
Is Markdown difficult to learn?
Not really.
The basic syntax can be learned quickly because there are only a handful of commonly used patterns.
You can start with:
# Heading

## Subheading

**Bold**

*Italic*

- List item

> Quote

`inline code`
Then learn fenced code blocks and links as you need them.
You don't have to memorize every Markdown feature before you start writing.
A previewer makes the learning process easier because you can experiment with the syntax and immediately see what happens.
A simple Markdown workflow
If you're new to Markdown, don't overcomplicate the process.
A practical workflow is:
1. Write the content
Focus on what you're trying to communicate.
2. Add structure
Use headings, lists, quotes, and code blocks where they make sense.
3. Preview it
Look at the rendered version rather than relying only on the raw Markdown.
4. Fix formatting
Check headings, lists, spacing, and code blocks.
5. Export or copy
Copy the Markdown if you're keeping the source, or copy the HTML if you're moving the rendered content into a website.
6. Keep the .md file
If the document is important, save the Markdown source so you can edit it later.
This workflow keeps the source and the published version connected.
Why keep the original Markdown?
If you've exported your document to HTML, it can be tempting to keep only the HTML version.
For longer documents, keeping the original Markdown is usually worthwhile.
Markdown is easier to edit than manually formatted HTML.
If you later need to change a heading, add a section, modify a code example, or reorganize the document, the Markdown source gives you a clean starting point.
Think of the Markdown file as the editable source and the HTML as one possible output.
When should you use Markdown?
Markdown is a good fit when you want:
Simple formatting
Portable documents
Readable source files
Developer documentation
README files
Technical notes
Version-controlled content
Easy conversion to HTML
It may not be the right choice for every document.
A highly designed brochure, complex layout, or print publication may need a more specialized tool.
Markdown is strongest when the content and structure matter more than elaborate visual formatting.
Try the UseFreeKits Markdown Previewer
If you're working with Markdown and want to see the rendered result while you write, the UseFreeKits Markdown Previewer & Exporter gives you the basic workflow in one browser-based tool.
You can:
Write or paste Markdown
See a live rendered preview
Switch between Split, Edit, and Preview modes
Preview headings, lists, quotes, and code
Copy the original Markdown
Copy the generated HTML
Download a
.mdfile
The tool supports CommonMark and GitHub Flavored Markdown features and is designed to process the content in the browser.
Open the UseFreeKits Markdown Previewer →
Frequently Asked Questions
What is Markdown?
Markdown is a lightweight markup language that uses simple text characters to represent formatting and document structure.
What is a Markdown previewer?
A Markdown previewer converts Markdown source into a rendered view so you can see how the document will look without manually converting it to HTML.
What is GitHub Flavored Markdown?
GitHub Flavored Markdown, or GFM, is a Markdown format used by GitHub that includes standard Markdown plus additional conventions and features.
Can Markdown be converted to HTML?
Yes. Markdown can be rendered into HTML. UseFreeKits provides a Copy HTML function for copying the rendered HTML output.
Can I download my Markdown file?
Yes. The UseFreeKits Markdown Previewer allows you to download the document as a .md file.
Can I use the tool for README files?
Yes. The tool specifically supports workflows involving README files and GitHub-style Markdown.
Does the Markdown previewer support code blocks?
Yes. It supports fenced code blocks and inline code, which makes it suitable for technical documentation and README files.
Can I preview headings and lists?
Yes. Headings, unordered lists, blockquotes, bold, italics, and other supported Markdown elements are rendered in the live preview.
Do I need an account to use the tool?
The UseFreeKits tool is designed as a free, browser-based utility without requiring a signup.
Is Markdown the same as HTML?
No. Markdown is a lightweight markup language designed to be easy to write and read. HTML is a more extensive markup language used to structure web pages. Markdown can, however, be rendered into HTML.
Final thoughts
Markdown is useful because it keeps formatting simple.
You can write a heading with a few characters, create a list without opening a formatting menu, and add a code block without manually writing HTML.
That simplicity is also why Markdown works so well for README files, technical documentation, project notes, and other content that needs to remain readable as plain text.
The part that can be less convenient is knowing exactly how your Markdown will look once rendered.
A live preview solves that problem.
Instead of repeatedly saving your file and opening it somewhere else, you can write the Markdown and see the rendered result at the same time.
If you need to move the finished content into a website, you can also copy the generated HTML. And if you want to keep the source, you can download the .md file.
For a simple way to write, check, and export Markdown from your browser, try the UseFreeKits Markdown Previewer & Exporter.